Create an Awesome Web Development Environment on Windows
Create a development environment worthy of a 10X Developer with WSL 2.0, Windows Terminal, ZSH, NVM, Docker and more.
Tuesday, Oct 27, 2020
Introduction
Until recently, if you were to ask any developer what their operating system of choice was, it would almost unanimously be some flavor of Linux or macOS.
For work, I use a Macbook Pro 15 (2018) which is an awesome development machine. With only a few installation/steps to get the machine up and running. For home and personal projects, I use two Windows 10 based machines.
Having been a windows user since 2012, it's still my operating system of choice from a productivity standpoint. However, for many development projects in the past it's been a major painpoint since a plethora of open-source tools/libraries have extra steps or don't work on Windows.
This barrier makes Windows a non-starter for a large majority of developers. Which is why many who need to use Windows for specific software applications that are not available on Linux, end up dual booting into both operating systems respectively.
Thanks to Windows Subsystem for Linux (WSL) 2.0, you no longer need to dual boot. Windows 10 has a linux kernal baked into the operating system, providing different distributions to choose from such as (Ubuntu, Debian, SUSE, Kali, Pengwin). Just need Windows 10 versions, (1903 & 1909) and newer.
Install the essentials
Visual Studio Code
*New Windows Terminal
 WSL
WSL
So what is WSL?
WSL stands for, "Windows Subsystem for Linux", and it allows you to run L64 binaries on windows. In WSL 1.0, Windows would emulate the linux system calls but in WSL 2.0, Microsoft included an entire linux kernal for full system compatability and up to 20X times boost in file system performance :fire:.
This makes it possible to run a much larger list of developer tooling and applications that we're not previously possible without dual booting into a partitioned image of linux.
Install WSL (Can skip if already using WSL 1.0)
Enable WSL Feature in Windows
To enable this feature, copy and paste the following command into Powershell opened as "Administrator"
Powershell (Run as Admin)
Enable-WindowsOptionalFeature -Online -FeatureName Microsoft-Windows-Subsystem-Linuxthen, reboot your machine.
Once your machine starts up, paste the following into Powershell
Powershell (Run as Admin)
dism.exe /online /enable-feature /featurename:Microsoft-Windows-Subsystem-Linux /all /norestart
dism.exe /online /enable-feature /featurename:VirtualMachinePlatform /all /norestart
Reboot Windows once again, then WSL inital setup is now complete.
If your starting with WSL for the first time with version 2.0, you may need to manually upgrade/install the WSL 2.0 Linux Kernal. Can find directions w/ a download here
Install a Linux Distro from the Microsoft Store
Go to the microsoft store and install the distro of your choosing. For the sake of simplicity, the rest of this post will be assuming Ubuntu as the selected Distro. Click here for Ubuntu Install
"Once installed, launch the distrubution and Ubuntu => The first time you launch a newly installed Linux distribution, a console window will open and you'll be asked to wait for a minute or two for files to de-compress and be stored on your PC. All future launches should take less than a second."
Validate your installed linux distro w/ its wsl version
wsl --list --verboseSet WSL as the default for all distros
wsl --set-version 2Now that WSL 2.0 is all set up, should complete the following to save some headaches later.
Upgrade from WSL 1.0 to WSL 2.0
Powershell (Run as Admin)
dism.exe /online /enable-feature /featurename:VirtualMachinePlatform /all /norestartNow Restart Your Machine.
Powershell (Run as Admin)
wsl --set-default-version 2You might encounter an error if upgrading. You may also have to re-install
Current bug issue here
> wsl --set-default-version 2
Error: 0x1bc
For information on key differences with WSL 2 please visit https://aka.ms/wsl2
How to fix it
wsl --set-default-version [distro name] 2Example(s)
wsl --set-default-version ubuntu 2wsl --set-default-version Ubuntu-18.04 2Update Your Ubuntu/Linux Distro
sudo apt-get update
sudo apt-get upgrade
sudo apt-get dist-upgrade
sudo apt-get autoremove
Install latest version of git
sudo apt install gitAdditionally set your git config credentials if you wish
git config --global user.name "[Name]"
git config --global user.email "[email]"
git config --global credential.helper cache --timeout=3600
 Windows Terminal (Quick Setup)
Install the new windows terminal if you haven't done so already.
Once you have WSL setup, you should see your Linux Distro as a profile option to launch.
We're going to make it the default, along with modifying a few options to take full advantage of WSL 2.0.
Ubuntu/Linux as default
Click the dropdown and click on settings, should open a settings.json file in VS Code.
Look inside of profile lists for your Distro profile, and copy "guid" property and replace that Id into the "defaultProfile" value up at the top.
Now when launching thew new terminal or a new tab, Ubuntu (or your distro) will be loaded by default.
Set starting directory to the Linux home folder.
By default, the starting directory for your linux terminal will start in the your windows file system. To take advantage of the performance improvements we will need to run our projects in the Linux File system.
If you cd ~ it will change to your Linux file system/home folder.
Let's change this to the default by modiyfing the Terminal Settings.json file "startDirectory": "//wsl$/Ubuntu/home/<yourname>/". (Optionally can modify the .bashrc file to accomplish this as well)
It should end up looking like this
{
"guid": "{2c4de342-38b7-51cf-b940-2309a097f518}",
"hidden": false,
"name": "Ubuntu 🐳🐱👤🐱💻",
"source": "Windows.Terminal.Wsl",
"useAcrylic": true,
"icon": "C:/Users/mjyoc/icons/ubuntu-icon.png",
"startingDirectory": "//wsl$/Ubuntu/home/mjyocca/"
}
 ZSH (Z-Shell)
Linux distributions such as Ubuntu, and previouly MacOS before the "Catalina" update, came with Bash as the default shell.
ZSH, or "Z Shell", is another shell that is extended from Bourne Shell that includes a collection of features and enhancements from bash and other shells. Features such as: Automatic cd (change directory), spelling correction and completion, and a plugin/theming system that powers many different plugin frameworks such as (Oh-My-Zsh).
Setup/Install ZSH
sudo apt-get install zshSetup/Install Oh-my-zsh
sudo apt install zsh
sh -c "$(curl -fsSL https://raw.githubusercontent.com/ohmyzsh/ohmyzsh/master/tools/install.sh)"
Once configured, the console will output
         __                                     __
  ____  / /_     ____ ___  __  __   ____  _____/ /_
 / __ \/ __ \   / __ `__ \/ / / /  /_  / / ___/ __ \
/ /_/ / / / /  / / / / / / /_/ /    / /_(__  ) / / /
\____/_/ /_/  /_/ /_/ /_/\__, /    /___/____/_/ /_/
                        /____/                       ....is now installed!
 NVM (Node Version Manager)
Node Version Manager (NVM) allows you to easily install and switch between any version of node. Making it incredibly handy for situations where you wish to experiment with new features, ensure your team are all using the same version, or run the same version of node between your local environment and backend hosted server.
Install nvm
Ubuntu
curl -o- https://raw.githubusercontent.com/nvm-sh/nvm/v0.35.3/install.sh | bashMay need to add the following to your (~/.bash_profile, ~/.zshrc, ~/.profile, or ~/.bashrc)
export NVM_DIR="$HOME/.nvm"
[ -s "$NVM_DIR/nvm.sh" ] && \. "$NVM_DIR/nvm.sh"  # This loads nvm
[ -s "$NVM_DIR/bash_completion" ] && \. "$NVM_DIR/bash_completion"  # This loads nvm bash_completion
Verify installation
command -v nvmInstall latest version of Node
nvm install nodeList all available versions
nvm ls-remoteSet/Alias as the default node version you want to be "default"
nvm alias default lts/erbiumSets the default to v12.18.3 LTS/Erbium release
To set back to the latest version of Node
nvm alias default nodeDefault at time of writing this, v14.9.0
Default NVM Node Version at New Terminal
On each new terminal session, we can make sure we're always running a particular version of Node to start with.
Place at end of your .zshrc file (or equivalent) after nvm script from above.
$HOME/.zshrc
export NVM_DIR="$HOME/.nvm"
[ -s "$NVM_DIR/nvm.sh" ] && \. "$NVM_DIR/nvm.sh"  # This loads nvm
[ -s "$NVM_DIR/bash_completion" ] && \. "$NVM_DIR/bash_completion"  # This loads nvm bash_completion

nvm use default # NVM set node version to our set default
If you kept the default alias as lts/erbium then at each new startup, our Node version would be LTS/Erbium v12.8.3.
Install Global NPM Dependencies when Node version changes
To Install certain global dependencies each time you install a new version of Node, create a filed called, default_packages in the .nvm/ directory from $HOME. List the npm packages on its own line.
$HOME/.nvm/default_packages
# $NVM_DIR/default-packages

rimraf
object-inspect@1.0.2
stevemao/left-pad
 Docker
What is Docker?
Docker is a platform that enables developers and system admins to build, run, and share applications while removing the complexities of host operating systems and infrastructure.

Docker shares a lot of the same characteristics of a Virtual Machine, however are far more lightweight and have far less overhead.
Virtual Machines utilize whats called a hypervisor, running a full-blown guest operating system to run and containerize the application(s) while running on top of the Host machine. In Contrast, Docker allows containers to be created while including only the absolute necessary code in order to run. (e.g. kernal, libraries, code, and runtime)
Docker allows us to create what is called a container. A container is just a running process of a Docker image, including everything the process/application needs to run.
Install Docker on Windows here
Enable Docker Desktop WSL 2 Backend
Docker officially supports WSL 2.0 as a backend option.
This option replaces the previous default which utilizes a Hyper-V backend. Not only does this decrease the complexity of maintaining separate build scripts for Linux & Windows users, but provides several performance benefits, allowing Docker Desktop to use less system resources and faster performance overall.
If you didn't select to enable this during installation or previously had it installed, you can enable it in the Docker Hub application option: Use the WSL 2 based engine.
Bonus
Vscode Customization
-
Remote Development Extension Pack
If you're working with WSL, Remote Servers in the cloud, or Docker Containers, this extension pack is a must. Link
Allows you to open any directory in a container, remote machine, and or Linux files within WSL.
Since VS Code is installed on your Windows side, this extension pack serves as a bridge to access the source files outside of your Windows File System.
FiraCode Font
Free monospaced font with programming ligatures. Link
Makes looking at your code a lot easier to read and digest while looking awesome.
Article on the setup process here
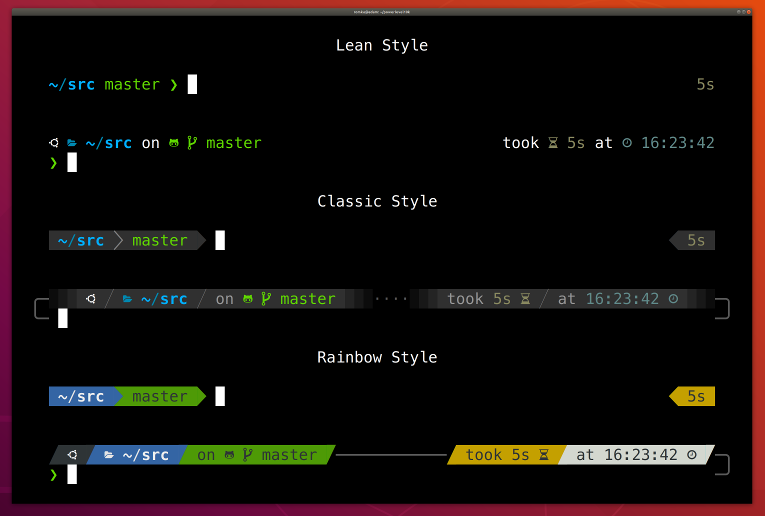
Oh-my-zsh Plugin (Powerlevel10k)
-
Powerlevel10k - A theme for ZSH to style your ZSH terminal
Install/Setup Powerlevel10k
git clone --depth=1 https://github.com/romkatv/powerlevel10k.git ~/powerlevel10kecho 'source ~/powerlevel10k/powerlevel10k.zsh-theme' >>! ~/.zshrcOnce installed you can run, p10k configure to launch the setup wizard to configure the theme to your liking.
Windows Terminal Customization
Windows UI/App enhancments
-
Files (UWP) - Modern open-source version of the legacy file explorer that is built into window. Can even pin your linux home directory to the sidebar and view your linux file system! Even though it's not the official file explorer its worth testing out.
-
TaskbarX - Allows you to configure and customize your taskbar. For example, justify your pinned apps to the center.
-
ModernFlyouts - Replaces the old volume control that's been in Windows since Windows 8. Has a modern overlay flyout to control volume and controls for whatever application is playing sound.
Windows still has a lot of eye sores even in 2020 but I'm optimistic it will get a lot better considering how far it has come.
Conclusion
Hopefully this provides a good blueprint to get your Windows enviornment up and running the way you want.
Cheers!